Monday, March 10, 2014

Tuesday, September 17, 2013
Hijab styles for special occasions
Once in a while we all get invited to that special event, women only, where we can finally get to dress up! I have been noticing so many different special hijab styles and they all look so complicated and sophisticated. So I decided to investigate and see if it's really that hard.
Amazingly, there are so many different ways to beautify your hijab and they are all affordable and easy. Here is a link to a Hijab with attached flower http://www.khimaronline.co.uk/crepe-flower-scarves/300-crepe-flowers-scarves.html. So all you have to do is simply put it on
 I love how it looks so elegant, effortless and unique. That is perfect for a graduation, wedding, or any other special occasion.
There are also millions of websites with different types of pins, that you can use to decorate your hijab. Here is a link to unique pins. http://www.etsy.com/listing/150128230/clear-crystal-3-inch-silver-hat-pin


And of course there are thousands of videos on Youtube, that describe you step by step process of transforming your every day hijab.
Amazingly, there are so many different ways to beautify your hijab and they are all affordable and easy. Here is a link to a Hijab with attached flower http://www.khimaronline.co.uk/crepe-flower-scarves/300-crepe-flowers-scarves.html. So all you have to do is simply put it on
There are also millions of websites with different types of pins, that you can use to decorate your hijab. Here is a link to unique pins. http://www.etsy.com/listing/150128230/clear-crystal-3-inch-silver-hat-pin


And of course there are thousands of videos on Youtube, that describe you step by step process of transforming your every day hijab.
And I have seen many girls using hair accessories for the hijab styles. Big flowers, head bands..... Possibilities are endless here.
I especially like this idea for young girls, who might be just starting to use hijab. This can be a great stimulant for them, a little support, proving that hijab doesn't in any way take away your beauty. So experiment with it and have fun!
Friday, January 18, 2013
Some useful tools for new moms
As a mother of very young kids I remember the struggles I went through when becoming a mom for the very first time. It seems that no matter how many books I read, how many wonderful pieces of advice I received I still had no idea what to do. But alhamdulillah, somehow with the help of Allah, you get a hang of it. And once the second child comes along you feel like a pro. :)
I wanted to share some really nice and useful tools that helped me out a lot when I finally got a title of a mother.
1. NURSING COVER
This became very useful when I was outside the house (doctor's office, store, mall, mosque, someone else's house) or when I had visitors over.

2. NURSING CLOTHES
It is also important to remember that you have to have appropriate clothing when planning on nursing your child. I love wearing abayas when I am out but they are not exactly nursing friendly. Here are couple of websites that sell maternity abayas with built-in zipper for nursing!! Very affordable as well

3. CAR SEAT CANOPY


I wanted to share some really nice and useful tools that helped me out a lot when I finally got a title of a mother.
1. NURSING COVER
This became very useful when I was outside the house (doctor's office, store, mall, mosque, someone else's house) or when I had visitors over.
And here is a video that shows you how to make it yourself
2. NURSING CLOTHES
It is also important to remember that you have to have appropriate clothing when planning on nursing your child. I love wearing abayas when I am out but they are not exactly nursing friendly. Here are couple of websites that sell maternity abayas with built-in zipper for nursing!! Very affordable as well
3. CAR SEAT CANOPY
I found it useful when I was at the store or in public and the lights and sounds seemed to bother my kids a lot. This way they slept better. They are made of very thin cotton and obviously you can just use a blanket instead. But these fancy canopies are cute and stay in place better because of the strap that is attached to car seat handle.
And here is the video of how to make it yourself :)
4. POSTPARDUM SUPPORT BELT
I have heard a lot about this invention from my family members who swore by it. I bought one and found it not that comfortable to wear. I gave up about a month after but keep hearing all these wonderful stories online and on TV. They also suggest wearing it after a major surgery (not baby related) so it seems like it is really useful
This is the image of a very old fashioned, cheapest version but they have since updated it drastically. They now come in different colors, designs and softness. Its pretty much up to you and how much you want to spend on it.
These are just some of the items that I can think of right now. Please share if you have any ideas that could benefit others.
If you are a new mom or going to be one, just remember that it is a very beautiful journey and what makes it so special is that you and your child go through all of the hiccups together. All the sleepless nights will pass, dirty diapers no more, screaming and fighting..... well that does not end. But subhanAllah, Allah chose you for this important role. Let's give thanks.
Thursday, January 17, 2013
Organizing your hijabs
Like the rest of the hijabees, I am having a lot of issues with organizing my hijabs. The problem seems to be the fact that I have way too many scarves that I don't wear anymore or haven't worn in years. So I decided to take control of the situation and make sure I utilize all of my resources :)
The first step was going through everything and donating, giving away, throwing away the scarves I don't like, need or simply can't wear anymore. You will be amazed at how many underscarves I had of the same color and some were given as gifts and simply didn't fit me right. Surprisingly, that reduced my "collection" in half.
Next step was going on Youtube, google, etc and browsing through hundreds of ideas that other muslim girls have. Here is the list of the solutions that helped me.
 This is a tie hanger that you can purchase at IKEA for $9.99 and that works out perfectly for your non-cotton hijabs. I noticed that if I use cotton ones they wrinkle quite a bit and so you will have to iron your scarf before wearing it.
 Also at IKEA you can find these drawer organizers that are very light and can be used for your underscarves or cotton 2 piece hijbabs. They are $3.99 each and come in different colors and sizes.
I use IKEA as an example because you can find that store in any country, state, etc. but there are lots of other places that sell similar stuff.
Here are some videos that are very useful as well.
The first step was going through everything and donating, giving away, throwing away the scarves I don't like, need or simply can't wear anymore. You will be amazed at how many underscarves I had of the same color and some were given as gifts and simply didn't fit me right. Surprisingly, that reduced my "collection" in half.
Next step was going on Youtube, google, etc and browsing through hundreds of ideas that other muslim girls have. Here is the list of the solutions that helped me.


I use IKEA as an example because you can find that store in any country, state, etc. but there are lots of other places that sell similar stuff.
Here are some videos that are very useful as well.
Watching these videos I get a little jealous because even though I organized my hijabs, they never stay that clean and neat..... Oh well. :)
Wednesday, December 5, 2012
Sweet Tortilla Snowflakes
I saw this beautiful idea in the magazine and I got so excited! This is an easy, cheap and very cute way of serving up something different. You can also include kids in making these snowflakes which means keeping them busy!

Some recipes that I found call for baking the tortillas, while others say you can deep fry them. So it is really up to you.

So here is the recipe:
1. Use flour tortilla and fold it several times just as you would with paper
2. cut out the designs you want
3. unfold it and either place it on the baking sheet at 350F for about 10 min, till light brown and crispy or fry it in the oil.
It seems to me that if you fry it, the tortilla will have bubbles from oil so baking will make it look more appealing.
4. decorate with powdered sugar, icing or color sugar. Use your imagination!
Tuesday, July 10, 2012
Sugar Cookies with Icing
This past weekend I was invited to a wonderful party hosted by my dear friend. Everything was so delicious (as usual mashAllah) but I was really impressed by amazing cookies that she made. They were not only beautiful but very yummy :)So I got inspired and found a whole list of easy recipes! These cookies can serve as party favors, table decorations (they have a pretty good shelf life)or simply a nice gift to your friends, neighbors or teachers. And with Ramadan coming up, this should be very useful inshaAllah.





This is actually from a website that sells Islamic stencils for baking.

I noticed that a lot of websites advise putting thicker icing on the edges of the cookie so the actual icing doesn't "run". You can find that icing in almost any store in the cooking section and it comes in a tube and has no gelatin alhamdulillah.
COOKIE RECIPE (yields ~36)
Ingredients
- 3 cups all-purpose flour
- 3/4 teaspoon baking powder
- 1/4 teaspoon salt
- 1 cup unsalted butter, softened
- 1 cup sugar
- 1 egg, beaten
- 1 tablespoon milk
- Powdered sugar, for rolling out dough
Directions
Sift together flour, baking powder, and salt. Set aside. Place butter and sugar in large bowl of electric stand mixer and beat until light in color. Add egg and milk and beat to combine. Put mixer on low speed, gradually add flour, and beat until mixture pulls away from the side of the bowl. Divide the dough in half, wrap in waxed paper, and refrigerate for 2 hours.
Preheat oven to 375 degrees F.
Sprinkle surface where you will roll out dough with powdered sugar. Remove 1 wrapped pack of dough from refrigerator at a time, sprinkle rolling pin with powdered sugar, and roll out dough to 1/4-inch thick. Move the dough around and check underneath frequently to make sure it is not sticking. If dough has warmed during rolling, place cold cookie sheet on top for 10 minutes to chill. Cut into desired shape, place at least 1-inch apart on greased baking sheet, parchment, or silicone baking mat, and bake for 7 to 9 minutes or until cookies are just beginning to turn brown around the edges, rotating cookie sheet halfway through baking time. Let sit on baking sheet for 2 minutes after removal from oven and then move to complete cooling on wire rack. Serve as is or ice as desired. Store in airtight container for up to 1 week.
ICING RECIPE (yields ~12)
Ingredients
1 cup confectioners' sugar
2 teaspoons milk
2 teaspoons light corn syrup
1/4 teaspoon almond extract
assorted food coloring
Directions:
1. In a small bowl, stir together confectioners' sugar and milk until smooth. Beat in corn syrup and almond extract until icing is smooth and glossy. If icing is too thick, add more corn syrup.
2. Divide into separate bowls, and add food colorings to each to desired intensity. Dip cookies, or paint them with a brush.
Monday, July 9, 2012
Fun summer recipes
STUFFED STRAWBERRIES

Ingredients:
-1 lb large strawberries
-8 oz. cream cheese, softened (can use 1/3 less fat)
-3-4 tbsp powdered sugar (4 tbsp for a sweeter filling)
-1 tsp vanilla extract
-graham cracker crumbs
-8 oz. cream cheese, softened (can use 1/3 less fat)
-3-4 tbsp powdered sugar (4 tbsp for a sweeter filling)
-1 tsp vanilla extract
-graham cracker crumbs
Directions:
1. Rinse strawberries and cut around the top of the strawberry. Remove the top and clean out with a paring knife, if necessary (some may already be hollow inside). Prep all strawberries and set aside.
2. In a mixing bowl, beat cream cheese, powdered sugar, and vanilla until creamy. Add cream cheese mix to a piping bag or ziploc with the corner snipped off.
3. Fill strawberries with cheesecake mixture. Once strawberries are filled, dip the top in graham cracker crumbs. If not serving immediately, refrigerate until serving
RASPBERRY ICE CREAM SANDWICHES

Ingredients:
10 ounces Vanilla Ice Cream, slightly softened
5 ounces Fresh Raspberries
Your favorite hot fudge sauce, optional
6 whole graham crackers, broken in half
5 ounces Fresh Raspberries
Your favorite hot fudge sauce, optional
6 whole graham crackers, broken in half
Directions:
1. In a bowl, combine the softened vanilla ice cream and the fresh raspberries. Stir until well mixed.If eating immediately following preparation: Divide the mixture evenly between the graham crackers and assemble 6 sandwiches by placing ice cream on top of a graham cracker half, followed by warm hot fudge sauce (about 2-3 teaspoons, if desired) and then another graham cracker half on top. Repeat with remaining ingredients. Serve immediately.
2. If preparing ahead of time: Press the ice cream mixture into a parchment paper lined rectangular plastic storage container (about 7 1/2 x 5 inches in size). Cover and freeze the ice cream until ready to serve.
3. Remove the ice cream from the plastic storage container and cut into 6 equally sized pieces, about the size of half a graham cracker. Place 1 ice cream square on top of a graham cracker half. Top with warm hot fudge sauce (about 2-3 teaspoons, if desired) and then add another graham cracker half on top. Repeat with remaining ingredients. Serve immediately.
CHUNKY MELON SALSA

Ingredients:
1/2 honeydew melon
1 cantaloupe
1/3 jalapeño
1/4 cup fresh cilantro
2 tablespoons fresh lime juice
1 jar TOSTITOS® Salsa
1 cantaloupe
1/3 jalapeño
1/4 cup fresh cilantro
2 tablespoons fresh lime juice
1 jar TOSTITOS® Salsa
Directions:
Finely chop first four ingredients. In large serving bowl, mix salsa, lime juice and chopped ingredients. Drain and refrigerate before serving with Baked! TOSTITOS® SCOOPS!® Tortilla Chips.
LEMONADE WITH BERRY ICE CUBES

Ingredients:
1 11.5-oz. can frozen concentrate strawberry or any berry mix juice
24 raspberries or 8 strawberries, sliced (optional)
2 quarts water
1 1/3 cups sugar (or more, to taste)
24 raspberries or 8 strawberries, sliced (optional)
2 quarts water
1 1/3 cups sugar (or more, to taste)
1 1/3 cups fresh lemon juice
8 lemon slices
8 mint sprigs
8 lemon slices
8 mint sprigs
Directions:
1. Pour the juice concentrate and 1 can of water into a pitcher. Mix to combine, then pour the juice into two ice cube trays, adding raspberries or sliced strawberries if you wish. Freeze.
2. Combine the 2 quarts of water and the sugar in a medium saucepan. Bring to a boil and stir to combine. Reduce to a simmer and cook until the sugar is dissolved, about 1 to 2 minutes.
3. Remove from heat. Strain the lemon juice through a fine sieve into the sugar syrup. Chill. Slit each lemon slice once, from center to rind, then press the slits onto eight glasses.
4. Fill each glass with 3 berry ice cubes and the lemonade. Garnish with a mint sprig. Makes 8 glasses.
Friday, July 6, 2012
Homemade pita bread
I love pita bread with almost every dish and always try to have it fresh at my house but sadly I noticed it doesn't taste the same on the second or third day. I knew that it wasn't that hard to bake but never really tried making it. I found this recipe on Martha Stewart's website and it seems very good.

- YieldMakes 8 pitas
Ingredients
- 1 1/4 cups warm water (100 degrees to 110 degrees)
- 1 teaspoon active dry yeast
- 3 cups all-purpose flour, plus more for dusting
- 1 tablespoon salt
- 1 1/2 teaspoons olive oil, plus more for bowl
Directions
- Pour water into the bowl of an electric mixer. Sprinkle yeast over water, and stir to dissolve. Use the paddle attachment to mix in 1 1/2 cups flour. Cover bowl; let sit in a warm place for about 1 1/2 hours, until dough has doubled in bulk.
- Sprinkle salt over flour and yeast mixture, and add olive oil and remaining 1 1/2 cups flour. Mix on medium-low speed until dough is smooth and elastic, about 5 minutes.
- Transfer dough to a floured work surface, and knead about 10 turns, forming a ball. Place in a lightly oiled bowl, and cover with plastic wrap. Let rise in a warm place until dough has doubled in bulk, about 1 1/4 hours.
- Heat oven to 450 degrees. Turn dough out onto a board, and cut in half. Cut each half into four pieces, and form each piece into a ball. Cover them loosely with a piece of plastic wrap to keep the dough from drying out. On a floured work surface, roll two balls into circles 7 inches in diameter and slightly less than 1/4 inch thick. Bake on an ungreased baking sheet until puffed and light brown, 6 to 8 minutes. Repeat, baking two pita breads at a time.
Friday, June 29, 2012
DIY Abaya in 2 hours Part II
Assalamu aleikum,
I really like my abaya that I made by combining a shirt and some material for the bottom part and sleeves. It is very comfortable and perfect for summer since I don't have to wear an underskirt.
But after some experimenting I came up with this nice design that is even easier to do since I used the long sleeve shirt.
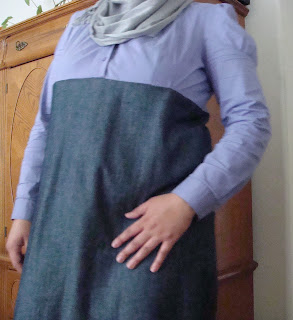

I really like my abaya that I made by combining a shirt and some material for the bottom part and sleeves. It is very comfortable and perfect for summer since I don't have to wear an underskirt.
But after some experimenting I came up with this nice design that is even easier to do since I used the long sleeve shirt.


As you can see, I just added the bottom part and kept the upper part intact. I used a very light lavender shirt that has really cute sleeves and added a dark jean material. What I love about this abaya is that jean material is very hard to stain and wrinkle which makes it perfect for me being around kids all day long. Also it is not hugging my shape and doesn't "stick" to me if the wind blows when I am outside. Alhamdulillah.
Try it if you get a chance and let me know what you think!
Muslim Cutie Baby Clothes


Check out their website and let me know what you think!
Homemade Oreo Cookies

I am not sure how familiar you are with the recent Oreo cookie controversy but I will update you on that issue. June 25th is the day when gay men and women have parades all around the world and Oreo cookie issued this picture in support of the event.

I LOVE Oreo cookies and there is no better dessert that a cookie soaked in milk! Now, I am very hesitant to buy them or even eat them because I feel, in a way, I will be supporting the gay parades. So here is the recipe I found online and it seems pretty easy to make! InshaAllah, that will satisfy my cravings :)
Oreo-style Cookies from Scratch (adapted from One Girl Cookies Bakery)
Chocolate Wafers
Ingredients:
2 cups all purpose flour
¾ cup white sugar
3 tablespoons cocoa powder
½ teaspoon table salt
1 cup bittersweet chocolate chips
4 tablespoons unsalted butter
2 eggs
In a small bowl, whisk together the flour, sugar, cocoa powder, and salt.
In a microwave safe bowl, melt chocolate chips and butter for 30 seconds. Stir them together and microwave an additional 30 seconds. Repeat this process until chocolate and butter have both melted.
Using either a hand-held mixer with the beaters or a stand mixer with the paddle, combine melted chocolate and butter, and mix on low speed for 20 seconds.
Add eggs one at a time and mix on low speed until fully combined. Scrape down the bowl with a rubber spatula.
Add dry ingredients and mix on low speed for 10 seconds. Finish mixing with ingredients with a rubber spatula by hand.
Using two sheets of parchment paper roll out dough to 1/8-inch thickness.
Refrigerate dough for one hour or until firm.
Preheat oven to 350 degrees
Using a small round cookie cutter cut out as many rounds as possible and place one inch apart on a parchment paper lined cookie sheet. You can reroll the scraps once.
Bake for five minutes, then rotate the pan in the oven and bake an additional five minutes.
When the cookies are cool enough to handle, fill with cream filling (see directions below). Set aside for 20 minutes while the filling firms up.
Cream filling
2 sticks unsalted butter (room temperature)
1 pinch table salt
2 cups confectioner's sugar
1 teaspoon vanilla extract
Using either a hand-held mixer with the beaters or a stand mixer with the paddle, cream butter and salt at medium speed until light and fluffy
Add half the confectioner's sugar and mix on low for 30 seconds. Scrape down the bowl.
Add vanilla and mix on low for 30 seconds. Scrape down the bowl.
Gradually mix in remaining confectioners' sugar, holding some back until you reach the desired consistency. It should be smooth and spreadable, but not so runny that it will drip off the cookie.
Fill chocolate wafers with pastry bag fitted with small tip. You can also spread carefully with a knife or small spatula. A modest amount (about a teaspoon per cookie) is better so it doesn't squeeze out from between the wafers.
Cookies can be stored for up to one week in an airtight container.
Thursday, May 31, 2012
DIY Abaya in 2 hours!
I found this wonderful idea on another website and decided to give it a try! I mean, to make an abaya in just 2 hours seemed pretty impossible. So I looked into it and I must say, if you have some sewing experience (and I don't mean a professional), then you will find this very helpful and useful inshaAllah.


 These are detailed pictures of the stitching and as you can see its not perfect (actually far from it) but it worked mashAllah!

 These are the pictures of the exact process. You can use any shirt you have (preferably cotton) and that will be the top part of the abaya since it is the hardest part to sew. You simply mark the area below your chest and then add material to the bottom.
 Detailed picture of the front of the abaya (original post)
 Sleeves. Here everything is simple too. You cut your shirt sleeves a little bit shorter (maybe 2 in but it really all depends on your taste) and add the same material you used for the body of the abaya. It will bring all of it together inshaAllah.

 The original post had these pictures of the finished product and as you can see the author made her abaya's body start right at the chest line so its all your choice.
I hope you find this post useful and try it for yourself! Please let me know if you have any questions! Enjoy!

So the picture above is what I ended up making! Honestly, I love this abaya, because how light and durable it came out. I used to have this long shirt (knee length) but I hated that it wrinkled so much and stained really quickly. It was just hanging in my closet with no use. I also had a maternity abaya, that was made of grey linen but alhamdulillah I had my baby and was not using it at all. After reading the instructions, I decided to put them 2 together.


I hope you find this post useful and try it for yourself! Please let me know if you have any questions! Enjoy!
Thursday, May 10, 2012
Fun Activity for Girls
If you have little girls, this activity looks simple but yet so beautiful. You can make these paper butterflies together and decorate her room. You could also use them as decorations for your next festivity or a simple picnic in the park.

Outside Activity for Boys and Girls - Painted Rock Playset
Since I have two little boys, I constantly find myself cleaning their mess. They LOVE getting into everything, reorganizing it and trying to figure out how things work alhamdulillah. I found it alot easier on myself if I am outside. There, they can dig in the dirt, play in the sand box, chase my poor cats, water the plants and do whatever else they find amazing!

I have found this wonderful activity that I think they will love. You can paint the rocks together and let them have a blast meanwhile teaching them colors, numbers, shapes, etc.
Fun and Creative Ideas For Homeschooling
I was browsing the internet and I found this multi-talented Muslimah, who is sharing her experience of homeschooling. MashAllah! So many beautiful ideas for different games, activities and fun things to do all while teaching your children our deen. Alhamdulillah!
Another website, which can be used for homeschooling but also for any type of festivities! If you are hosting an Eid party, you can print your own puzzles, word searches, etc and use words according to your theme (Islam, Hajj, Fasting).
Another website, which can be used for homeschooling but also for any type of festivities! If you are hosting an Eid party, you can print your own puzzles, word searches, etc and use words according to your theme (Islam, Hajj, Fasting).
Pillars of Islam File Folder Game | Umm Abdul Basir's Creative Corner
I have found this wonderful blog with so many beautiful ideas! MashAllah, this mother has 6 children (including a new born), homeschooling and finding time to be so creative! Allahu Akbar! I am speechless :)
Pillars of Islam File Folder Game | Umm Abdul Basir's Creative Corner
Pillars of Islam File Folder Game | Umm Abdul Basir's Creative Corner
Origami Stars
A very dear friend of mine suggested making Origami Stars as decoration for Eid! I have always been fascinated by origami but unfortunately did it back when I was in Kindergarden. But it looks beautiful and doable!
Thank you for your suggestions and enjoy!
Tuesday, May 8, 2012
Pecan Fun
Since we are on this topic, I found this website! I can't believe how many people love pecans. Anyway, here are some yummy and nutritious recipes I found. Enjoy

Easy Fettucine

Pecan Pie

Butter Pecan Cupcakes with Brown Sugar Frosting (YUM)
Easy Fettucine
Pecan Pie
Butter Pecan Cupcakes with Brown Sugar Frosting (YUM)
My secret to best tasting pecans
I am personally ok with pecans but my entire in - law family is in LOVE with them. They like pecans in their pancakes, cakes, banana bread, etc. So since I started adding it to everything I bake, I always had a bag of chopped nuts.
Unfortunately, I ran out but had a bag of whole pecans. What I have personally discovered was that if you use the whole pecans, chop them right before using them, they add an incredible flavor to your food mashAllah! Now, I understand why people go nuts for it :)
You can either use a knife and simply chop them up or use a spice mixer grind as pictured below. And while you do that, you can even see the oils come out! SubhanAllah, what a difference! Also, the nuts get really really soft while cooking, which is different comparing to pre-chopped nuts (in my case, they very rarely soften up).
 So try it for yourself and let me know what you think inshaAllah!
Unfortunately, I ran out but had a bag of whole pecans. What I have personally discovered was that if you use the whole pecans, chop them right before using them, they add an incredible flavor to your food mashAllah! Now, I understand why people go nuts for it :)
You can either use a knife and simply chop them up or use a spice mixer grind as pictured below. And while you do that, you can even see the oils come out! SubhanAllah, what a difference! Also, the nuts get really really soft while cooking, which is different comparing to pre-chopped nuts (in my case, they very rarely soften up).

Monday, May 7, 2012
Homemade playdough
My oldest son loves playing with playdough! I am happy because it develops several of his skills but at the end of the day it gets so gross that I simply have to throw it away. I found this easy recipe to make your own playdough, which means I can make a whole bunch of it inshaAllah!

I have also found several other recipes which include Kool Aid! I am thinking you can use juice, lemonade or another other drinkable substance!
Subscribe to:
Posts (Atom)